Salads
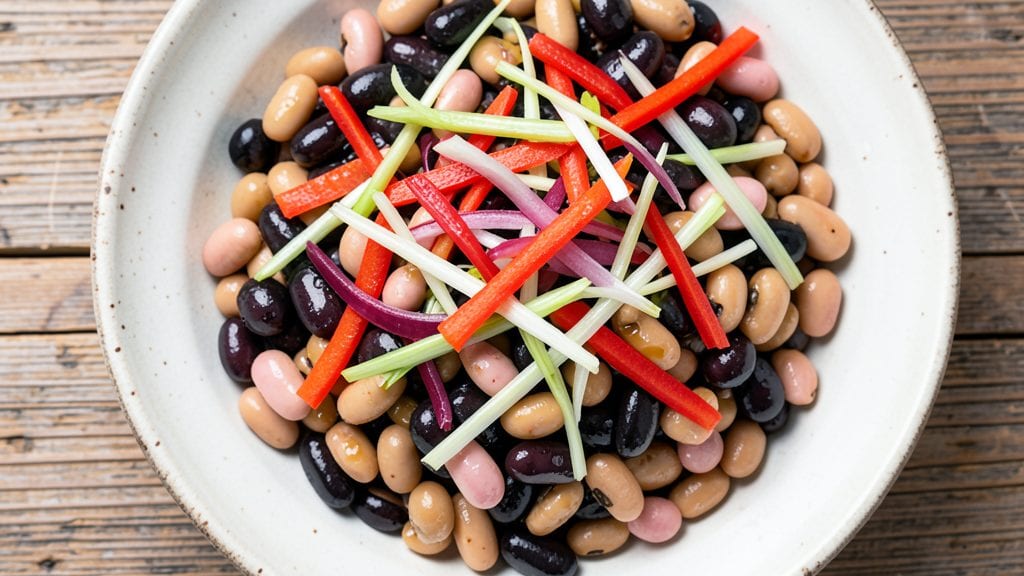
Creating a Bush's dense bean salad transforms simple canned beans into a hearty, restaurant-worthy dish with just a few key techniques. The secret lies in proper bean selection—using a mix of white, pink, and black beans creates that signature hearty texture without requiring soaking or pre-cooking.
I developed this recipe after realizing most store-bought versions lacked depth, so I focused on balancing protein, fresh vegetables, and a tangy vinaigrette that cuts through the richness.
What sets this salad apart is the methodical approach to texture and flavor. First, beans are drained, rinsed, and lightly tossed with olive oil and salt to enhance their natural nuttiness.
Then, crisp vegetables like bell peppers, red onion, and celery are julienned for even distribution, while fresh herbs add brightness. The dressing—made with red wine vinegar, Dijon mustard, and a touch of honey—binds everything together without overpowering the beans' earthy flavor.
When assembled, this salad delivers a perfect balance of tender beans, crisp vegetables, and a bright, tangy dressing that keeps every bite interesting. The beans hold their shape while absorbing just enough dressing to create a cohesive, satisfying mouthful.
It's the kind of dish that feels substantial enough for a main course but light enough for a side—ideal for potlucks, office lunches, or a quick weeknight dinner.
For best results, let the salad sit for 20 minutes before serving to allow flavors to meld. Pair it with crusty bread or grilled chicken for a complete meal.
The recipe scales easily, so you can make a large batch for meal prep or double for gatherings. Here's how to assemble it perfectly every time.
Ingredients for bush's dense bean salad
Three canned beans, crisp veggies, and a tangy dressing make this hearty salad restaurant-quality.
| Ingredient | Amount | Notes |
|---|---|---|
| Canned White Beans 🌱 | 1 can | Drained and rinsed thoroughly |
| Canned Pink Beans 🌱 | 1 can | Drained and rinsed thoroughly |
| Canned Black Beans 🌱 | 1 can | Drained and rinsed thoroughly |
| Red Bell Pepper 🌶️ | 1 whole | Julienned into thin strips |
| Red Onion 🧅 | 1 whole | Julienned into thin strips |
| Celery Stalks 🥬 | 3 whole | Julienned into thin strips |
| Extra-Virgin Olive Oil 🫒 | ¼ cup | For tossing beans |
| Red Wine Vinegar 🍷 | ¼ cup | For tangy dressing |
| Dijon Mustard 🧂 | 1 tbsp | For dressing depth |
| Honey 🍯 | 1 tbsp | Balances acidity |
| Fresh Parsley 🌿 | ¼ cup | Chopped for freshness |
| Fresh Cilantro 🌿 | ¼ cup | Chopped for brightness |
| Kosher Salt 🧂 | 1 tsp | Diamond Crystal preferred |
| Freshly Ground Black Pepper 🌶️ | ½ tsp | For subtle heat |
The beans are the foundation—Del Monte or Bush's brands work best since they hold their shape without getting mushy. Trader Joe's has the best selection of pre-drained beans in a pinch. For the vegetables, look for bright, firm red bell peppers and crisp celery with no brown spots. The red onion should be vibrant and firm—avoid the wilted ones at the back of the display. Fresh herbs are non-negotiable here; Wilting parsley or cilantro will make the salad taste flat, so grab them last at the store.
No red wine vinegar? Apple cider vinegar works in a bind, though it’ll taste slightly sweeter. Skip the pre-shredded bell peppers—they’re sad and limp. Baby carrots or jicama can replace celery if you’re out, but they’ll change the texture. The dressing ratio is key: 1 part honey to 2 parts vinegar keeps it balanced. If you’re making this ahead, store the dressing separately until ready to toss—it’ll keep the salad crisp longer. For extra protein, toss in crumbled feta or toasted pumpkin seeds at the end.
This salad tastes even better the next day—flavors meld beautifully after 20 minutes of chilling. Store leftovers in an airtight container for up to 5 days in the fridge. The dressing separates, so give it a quick stir before serving. For meal prep, portion into single servings with a small container of dressing on the side. It reheats surprisingly well if you’re using it for lunches—just warm the beans gently and toss with fresh herbs.
Why You'll Love This Recipe
- No-Chop Nightmare: I swear by this recipe when I’m too tired to dice anything. Just drain those canned beans—white, pink, and black—and toss them with raw red onion (even the tough outer layers soften nicely) and diced bell pepper straight from the jar (pre-cut if you’re really lazy). The texture’s hearty but still light, and honestly? Nobody cares if it’s "perfectly" chopped.
- Umami Bomb: That mix of beans—creamy whites, meaty blacks, and slightly sweet pinks—creates this deep, earthy flavor that’s ridiculously satisfying. The raw red onion adds a sharp bite that cuts through the richness, while the bell pepper brings just enough brightness to balance it all. It’s the kind of dish that makes you go, "Wait, is this supposed to be this good?"
- Potluck Hero: This salad holds up perfectly at room temp, so it’s my go-to for picnics, BBQs, or when my in-laws ask what I’m bringing. Serve it alongside grilled meats, in tacos, or even straight from the bowl—it’s that versatile. (Yes, even my picky 12-year-old nephew finishes his portion.)
- Pantry Magic: Three cans of beans, one onion, one pepper—that’s it. No fancy ingredients, no last-minute grocery runs. I’ve made this with whatever was in my cupboard, and it’s always solid. Plus, it keeps for days in the fridge, so you’re not scrambling to eat leftovers before they go bad. Budget-friendly? Absolutely. Reliable? Even more so.
Step-by-step instructions for Bush's dense bean salad recipe
Here's how to build a hearty, textured bean salad with a bright vinaigrette that stays fresh for days.
Prepare the Vegetable Base
Start by julienning the red bell pepper, red onion, and celery stalks into thin strips using a sharp mandoline or chef's knife. I like to work in batches—first the pepper, then onion, then celery—to keep everything uniform. The goal is to create long, thin matchsticks that will hold their shape when tossed with the beans.
Spread each vegetable on a separate plate as you cut them. This makes it easier to see what you're doing and prevents cross-contamination of flavors. Once all your vegetables are julienned, give them a quick taste test—you want the pepper to be sweet, the onion to have a sharp bite, and the celery to add crispness. If any taste bland, don't worry; the dressing will elevate everything.
Combine and Toss the Beans
Drain and rinse the canned white beans, pink beans, and black beans thoroughly under cold water. This removes any excess starch that could make the salad gummy. I like to use my hands for this step—it's faster than a colander and helps me feel the texture of the beans. Once drained, spread them on a clean kitchen towel to absorb any remaining moisture.
In a large mixing bowl, combine all three types of beans with the julienned vegetables. Give everything a gentle toss with a wooden spoon or your hands, making sure the beans and vegetables are evenly distributed. You want the beans to be coated with the vegetables but not mashed—this salad should have texture, not be mushy. If you notice any particularly large bean chunks, break them up lightly with your fingers to maintain consistency.
Whisk the Tangy Vinaigrette
In a small bowl, whisk together the extra-virgin olive oil, red wine vinegar, Dijon mustard, honey, kosher salt, and freshly ground black pepper. Start with a slow whisk to combine the ingredients, then increase speed to emulsify the dressing. The honey and Dijon mustard are key here—they balance the acidity of the vinegar and add depth of flavor.
Taste the dressing before adding it to the beans. It should be tangy but not overpowering, with a slight sweetness from the honey. If it needs more salt, add a pinch at a time. If it's too thick, whisk in a teaspoon of water to loosen it. The dressing should coat the back of a spoon but still be pourable. This is the moment that matters: the perfect dressing makes or breaks this salad.
Toss and Season the Salad
Pour the vinaigrette over the bean and vegetable mixture in the large bowl. Using your hands or a wooden spoon, toss everything together until the beans and vegetables are evenly coated. You'll notice the colors deepen as the dressing clings to the ingredients—this is your visual cue that it's coming together. The salad should look vibrant, with no dry spots.
Let the salad sit for 10 minutes at room temperature before serving. This allows the flavors to meld and the dressing to fully penetrate the beans. Give it one final taste and adjust the seasoning if needed. The parsley and cilantro will be added last—hold them back until serving to keep their freshness and bright green color. Sprinkle them over the top just before serving for that restaurant-quality finish.
Chill and Serve
Transfer the salad to an airtight container and refrigerate for at least 2 hours before serving. Chilling allows the flavors to develop fully and the textures to set. When you're ready to serve, give it one final toss to redistribute any ingredients that may have settled. The salad should be cool, vibrant, and packed with texture—no soggy beans in sight.
Serve the salad chilled as a side dish or a light main course. The contrast of the warm, hearty beans with the cool, tangy dressing is what makes this salad special. If you're serving it as a main, pair it with crusty bread or a simple protein like grilled chicken. Leftovers keep well for up to 5 days in the refrigerator, making this a perfect make-ahead dish for meal prep.
Pro Tips For Making Bush'S Dense Bean Salad
- Drain and Rinse Properly: Dump those beans straight from the can into a colander—don’t just pour the liquid off. The starchy residue clings to the beans like glue, making the salad taste flat and gummy. A quick cold water rinse (even a splash in the sink) cuts through that film and keeps the texture crisp. I learned this the hard way after a salad that tasted like it was swimming in bean water.
- Dice the Onion Small: Tiny dice, not chunks. The red onion’s sharpness needs to marry with every bite, not lurk as an afterthought. Cut it into 1/8-inch pieces—small enough to disappear into the mix but big enough to keep texture. (Yes, it takes longer. No, you won’t regret it.)
- Roast the Bell Pepper: Skip the raw pepper’s watery bite by roasting it first. Char it under the broiler for 5–7 minutes, then peel off the skin while it’s still hot. The flavor deepens, the texture softens, and it blends into the salad instead of sitting there like a sad, undercooked vegetable. (Pro move: Do this while the beans drain.)
- Toss with Wet Hands: Dry hands = dry salad. The beans absorb moisture like sponges, so wet your fingers (or use a splash of olive oil) to help the dressing cling. It’s weirdly satisfying, and the result is a salad that stays together for days—not a sad, crumbly pile. (Your future self will thank you when you pack leftovers.)
Storing and reheating this bush's dense bean salad
Refrigerator Storage
Store your dense bean salad in an airtight glass container with a tight-sealing lid—I recommend Pyrex or Cambro containers for best results. Keep it chilled at 40°F or below for up to 5 days, though I find the flavors peak after 24-48 hours as the dressing fully infuses.
The beans hold their texture beautifully when refrigerated, but the parsley and cilantro may wilt slightly. That’s why I always add fresh herbs just before serving. 🥗
Freezer-Friendly Prep
This salad isn’t ideal for long-term freezing because the vegetables lose their crispness, but you can freeze the dressing separately for up to 3 months in a silicone ice cube tray. Once thawed, whisk it back together and toss with fresh beans and veggies.
For the beans and vegetables, freeze them unmixed in a single layer on a tray before transferring to a freezer bag—this prevents clumping. Just add fresh herbs and dressing when ready to eat. ❄️
Reheating Leftovers
If you’re reheating for lunches, I recommend warming the beans and vegetables separately in a skillet over medium heat for 3-4 minutes with a splash of water or broth. This prevents them from becoming mushy.
Then, toss with fresh herbs and dressing at room temperature—never microwave the whole salad as it’ll turn rubbery. For extra flavor, add a pinch of smoked paprika or garlic powder when reheating. 🔥
Portioning for Meal Prep
Divide the salad into single-serving containers with a small compartment for the dressing on the side. This keeps the beans and veggies crisp while allowing you to customize the tanginess with each serving.
I use mason jars for easy grab-and-go lunches—the dressing stays at the bottom, so you can shake it up when ready to eat. Label with the date to track freshness. 📅
Reviving Wilted Herbs
If your stored salad has wilted herbs, don’t toss it! Simply chop fresh parsley and cilantro and mix them in right before serving. For extra vibrancy, add a squeeze of lemon juice or a sprinkle of everything bagel seasoning to brighten the flavors.
The beans and veggies will still taste great—it’s all about the finishing touches. ✨
Nutrition facts
Frequently asked questions
Why does this bean salad stay dense instead of getting soggy?
The secret is in the julienned vegetables and proper bean preparation. Thin strips of bell pepper, onion, and celery create surface area without adding excess moisture, while thoroughly rinsing and draining the beans removes starch that causes mushiness. The dressing is added just before serving to preserve texture.
Can I use dried beans instead of canned for a more traditional version?
Cook 1 cup dried beans (white, pink, and black) until tender but not mushy (1-1.5 hours with soaking). Drain well and pat dry completely—this extra step is crucial for maintaining that signature dense texture. The flavor will be even more developed, but the cooking time increases significantly.
What's the best way to make this salad ahead of time?
Prepare everything except the herbs and dressing, then store the bean-vegetable mix in an airtight container for up to 3 days. Keep the dressing separate until ready to serve—this prevents wilting. When ready, toss with fresh herbs and dressing just before eating. For maximum freshness, assemble completely and refrigerate for 2-3 hours before serving.
How can I make this salad more substantial for a main course?
Add 1 cup cooked quinoa or ½ cup toasted chickpeas to bulk up the protein. For extra heartiness, fold in ½ cup crumbled feta or ¼ cup chopped walnuts before serving. The beans already provide plenty of protein, but these additions create a more filling meal. Pair with warm crusty bread for a complete dish.
What's the ratio of beans to vegetables that makes this salad perfect?
The ideal ratio is 3 parts beans to 1 part vegetables by volume. This creates that signature dense texture while keeping the vegetables crisp. For example, 3 cups beans mixed with 1 cup julienned vegetables gives the perfect balance. Adjust slightly if you prefer more or less vegetable crunch.