Desserts
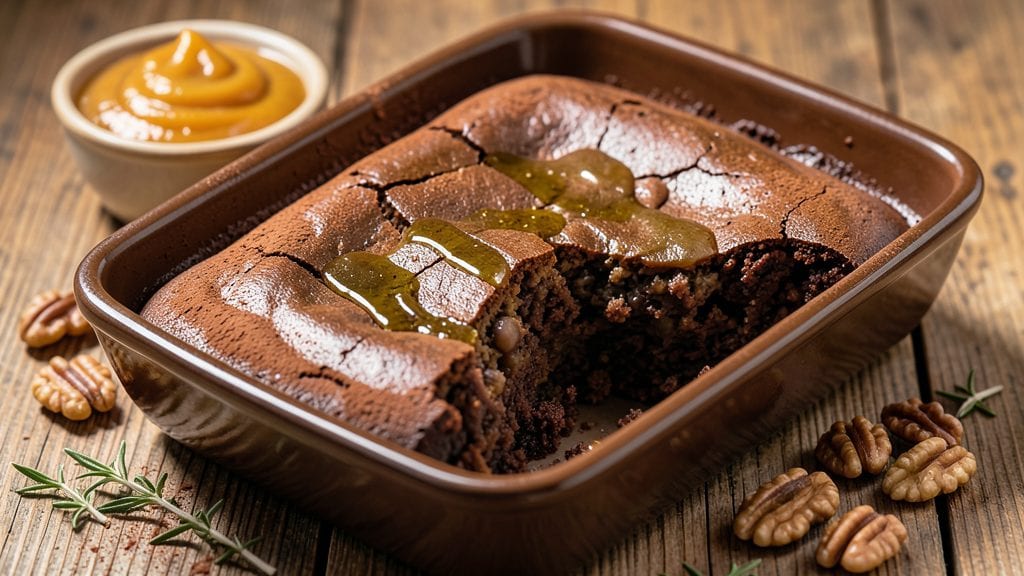
This bean brownie recipe delivers the perfect balance of fudgy centers and crunchy chocolate tops—all without eggs or butter. The secret lies in black beans, which create a rich, moist texture while keeping the brownie dense and satisfying.
I developed this version after years of testing vegan desserts, and it’s now my go-to for rich, decadent brownies that even non-vegan eaters can’t resist.
The beauty of this recipe is its simplicity—just a few pantry staples transform into a professional-quality dessert. The beans blend seamlessly into the batter, providing moisture and structure without altering the chocolate flavor.
A sprinkle of chocolate chips or chopped nuts on top adds texture, while baking at 350°F ensures a crispy exterior and a gooey interior every time.
What you’ll end up with is a rich, velvety brownie with a crackly chocolate crust that’s impossible to resist. The fudgy center melts in your mouth, and the contrast of textures makes each bite unforgettable.
Serve it warm with vanilla ice cream or dusted with powdered sugar for a restaurant-worthy finish.
These brownies also freeze beautifully, making them ideal for meal prep or gifting. Whether you’re baking for a crowd or treating yourself, this recipe delivers restaurant-quality results with minimal effort. Let’s get started!
Ingredients for bean brownie
Pantry staples transform into decadent, restaurant-quality bean brownies—rich, fudgy, and crunchy without eggs or butter.
| Ingredient | Amount | Notes |
|---|---|---|
| Black Beans 🌱 | 1 can | Drained and rinsed thoroughly |
| Unsweetened Applesauce 🍎 | ½ cup | For moisture and binding |
| Extra-Virgin Olive Oil 🫒 | ½ cup | For richness and moisture |
| Granulated Sugar 🍚 | 1 cup | For sweetness and structure |
| Cocoa Powder 🍫 | 1 cup | Natural, unsweetened preferred |
| All-Purpose Flour 🌾 | ¾ cup | For texture and binding |
| Baking Powder 🍞 | 1 tsp | For lift and structure |
| Salt 🧂 | ½ tsp | Diamond Crystal preferred |
| Vanilla Extract 🌿 | 1 tbsp | Pure, high-quality preferred |
| Chocolate Chips 🍫 | 1 ½ cups | Semi-sweet or dark vegan chips |
| Chopped Walnuts 🥜 | ½ cup | Toasted for extra flavor |
| Powdered Sugar 🍚 | ¼ cup | For dusting and finishing |
The black beans are the unsung hero here—Trader Joe’s or Goya brands work best for their consistency. Look for no-salt-added varieties to control sweetness. The cocoa powder matters too: Valrhona or Dutch-processed gives deeper flavor. I always toast my walnuts in a dry pan for 30 seconds—enhances their nutty punch. For chocolate chips, Enjoy Life brand is my go-to for vegan-friendly options, but any dairy-free chips work. The applesauce keeps the texture moist without altering the chocolate flavor, so don’t skimp on quality.
No applesauce? Silken tofu or mashed banana works in a pinch (use half the amount). Short on walnuts? Pecans or almonds add a different texture. The baking powder is crucial—don’t substitute baking soda unless you add an acid like vinegar. For extra fudginess, add 0.25 cup extra cocoa powder (reduce sugar by 0.25 cup). The chocolate chips can be swapped for chopped vegan chocolate bars—just chop them finely. If you love texture, fold in 0.25 cup crushed pretzels for a salty contrast.
These brownies keep for 5 days in an airtight container at room temperature, but they’re best fresh. For longer storage, freeze sliced portions in a sealed bag for up to 3 months. Reheat slices in the oven at 300°F for 5 minutes to restore crispiness. I always double the batch—they disappear fast. Dust with powdered sugar right after baking for that bakery finish, or serve warm with vanilla coconut yogurt for a creamy pairing.
Why You'll Love This Recipe
- No Mixer Needed: I blend everything in one bowl—no fancy equipment, no extra steps. The black beans and applesauce do all the heavy lifting, turning into a fudgy, dense brownie with zero effort.
- Fudgy Without Guilt: That rich cocoa powder meets the natural sweetness of applesauce and sugar, but the black beans keep it moist and satisfying. It’s decadent but secretly sneaky—like dessert with a side of nutrition.
- Bake Once, Enjoy Twice: Cut the batter into squares and bake them into a single pan, then freeze half for later. No reheating required—just grab and go when cravings hit.
- Budget-Busting Indulgence: A can of beans and a bag of cocoa powder stretch farther than you’d think. Honestly, I’ve made this for potlucks, study snacks, and lazy Sundays—it’s my go-to when I don’t want to break the bank.
Step-by-step instructions for bean brownie recipe
This method delivers decadent, fudgy brownie centers with a rich chocolate top every time.
Prepare the Bean Base for Moisture and Binding
Begin by draining and rinsing the 1 can black beans thoroughly under cold water. This removes excess starch that could make your brownies gummy. Transfer the beans to a food processor and pulse until completely smooth, scraping down the sides as needed. The beans will act as a natural binder and moisture source, replacing eggs while keeping the texture rich and dense.
In a separate bowl, whisk together the 0.5 cup unsweetened applesauce and 0.5 cup extra-virgin olive oil. The applesauce adds natural sweetness and lightness, while the olive oil contributes richness that mimics butter's fat content. Let this mixture sit at room temperature for 5 minutes—this ensures even distribution when combined later. The olive oil should be at a neutral temperature, not warm, to prevent the chocolate from seizing.
Combine Wet Ingredients for a Smooth Batter
In the food processor with the bean purée, add the 1 cup granulated sugar, 1 cup cocoa powder, 1 tbsp vanilla extract, 0.5 tsp salt, and 1 tsp baking powder. Process on medium speed until fully incorporated, about 1-2 minutes. The mixture should be thick but pourable, with no visible lumps. If it appears too stiff, add 1-2 tablespoons of hot water to loosen it—this helps create that signature fudgy texture.
Transfer the wet mixture to a large mixing bowl. Gently fold in the 1.5 cups chocolate chips and 0.5 cup chopped walnuts using a silicone spatula. Avoid overmixing—just enough to distribute the chocolate and nuts evenly. The walnuts add a delightful crunch that contrasts beautifully with the fudgy center, while the chocolate chips ensure pockets of melty goodness in every bite. Set the batter aside while you prepare your baking pan.
Bake to Perfection for Crispy Edges and Fudgy Centers
Preheat your oven to 350°F and line a 9x13-inch baking pan with parchment paper, leaving an overhang on all sides for easy removal. Pour the batter into the prepared pan and smooth the top with a spatula. Bake for 25-30 minutes, until the edges are set but the center still appears slightly underdone. A toothpick inserted into the center should come out with moist crumbs—this indicates the perfect fudgy texture inside.
Here's the secret to that signature crispy chocolate top: After 20 minutes of baking, sprinkle the 0.25 cup powdered sugar evenly over the surface. Return the pan to the oven and bake for the remaining time. The powdered sugar caramelizes slightly, creating a beautiful, crackly crust that contrasts with the soft interior. Watch closely in the last 5 minutes—the top should darken to a deep chocolate brown but not burn.
Cool and Finish for Maximum Flavor Impact
Remove the brownies from the oven and let them cool completely in the pan for 1 hour. This resting period allows the flavors to meld and the texture to set properly. I know it's tempting to cut into them immediately, but patience here makes all the difference—your brownies will hold their shape and deliver that perfect balance of fudgy and crispy.
Once cooled, use the parchment overhang to lift the brownies out of the pan and cut into 12 equal squares using a sharp knife. For an extra touch, dust the top with additional powdered sugar before serving. These brownies keep well at room temperature for 3-4 days in an airtight container, though they rarely last that long in my house! The combination of rich chocolate, crunchy walnuts, and that irresistible crispy top makes them impossible to resist.
Pro Tips For Making Bean Brownie
- Mash Those Beans: Drain and rinse the black beans thoroughly—no one likes a gummy brownie. Then, mash them with a fork until they’re smooth but still hold a little texture, like hummus. Over-blending turns them into glue; under-mashing leaves dry spots. (Yes, even if you’re impatient like me.)
- Whisk the Cocoa: Sift that cocoa powder first, then whisk it with the sugar and applesauce before adding anything else. This cuts out clumps like magic—no one wants to bite into a gritty surprise. Stir in the olive oil last, or you’ll end up with a weird separation.
- Watch the Fudge Stage: Pull the pan out of the oven when the edges look set but the center still jiggles slightly—like a wobbly Jell-O. Black bean brownies firm up as they cool, so rushing to check early means a dense, underdone mess. Give it 5 minutes, then test with a toothpick. (If it’s clean but the center looks wet, it’s fine.)
- Swap the Oil: Trade the olive oil for melted coconut oil or butter if you’re skeptical—it adds richness and cuts the earthy bean flavor. Need a shortcut? Use 1 tablespoon less oil than the recipe calls for; black beans are sneaky and add moisture. (I learned this the hard way after a soggy batch.)
Pro cooking tips for great bean brownie
Bean Purée Mastery
Start with cold, drained black beans—never warm or canned liquid—to prevent gummy brownies. Pulse them in a food processor until completely smooth, like hummus. If your processor struggles, strain through a fine-mesh sieve to eliminate any remaining chunks.
I use a Ninja BN601 for this step because its sharp blades handle beans effortlessly. 🌱
Texture Control Secrets
The key to fudgy perfection lies in underbaking slightly. Remove your brownies when the edges are set but the center still jiggles like Jell-O. Overbaking dries them out—trust the toothpick test. For extra moisture, fold in 1 tbsp melted coconut oil with the chocolate chips.
The olive oil in the batter already provides richness, but this extra fat ensures that signature dense texture.
Oven Temperature Tips
Your oven might run hotter than it says—350°F is just a starting point. I always test my oven with an oven thermometer (the Thermoworks Oven Thermometer is my favorite) and adjust by 10-15°F if needed.
For even baking, place a small baking sheet on the lower rack to catch drips. This prevents the pan from sitting directly on the heating element, which can cause uneven cooking.
Crispy Top Hack
The powdered sugar topping isn’t just for looks—it’s a caramelization catalyst. Sprinkle it evenly after 20 minutes, then return to the oven immediately. The sugar melts, then rehardens into a crackly crust.
For extra drama, add 1 tsp espresso powder to the batter before baking—it deepens the chocolate flavor and enhances the crispy effect. Watch closely in the last 5 minutes to avoid burning.
Mixing Like a Pro
Use a silicone spatula to fold in chocolate chips and nuts—it won’t scratch your bowl like metal tools. Gently fold just until combined; overmixing develops gluten in the flour, making brownies tough.
For a marbled effect, swirl in 2 tbsp white chocolate chips after folding—it creates beautiful contrast when baked. I also recommend using a 9x9-inch pan instead of 9x13 for thicker, more decadent slices.
Cooling Patience Pays
Resist the urge to cut into warm brownies—they’ll crumble. Let them cool completely in the pan for 1 hour, then chill in the fridge for 20 minutes before slicing. This resting time allows flavors to meld and the texture to set properly.
For clean cuts, dip your knife in hot water between slices. Store leftovers in an airtight container with parchment between layers to prevent sogginess. 💫
Nutrition facts
Frequently asked questions
Why do these brownies use beans instead of eggs?
Beans act as a natural binder and moisture source, replacing eggs while keeping the texture rich and fudgy. The black beans blend seamlessly into the batter, providing structure without altering the chocolate flavor. This makes them perfect for vegan baking while delivering a satisfying, dense result.
Can I make these brownies gluten-free?
Simply substitute the 0.75 cup all-purpose flour with a 1:1 gluten-free baking flour blend like Bob's Red Mill. For best results, add 0.5 tsp xanthan gum to help maintain structure. The rest of the recipe remains the same—just ensure all other ingredients are certified gluten-free.
How do I avoid a dry or cakey texture?
Underbaking slightly is key—remove brownies when the edges are set but the center still jiggles. Overbaking dries them out. Also, ensure your beans are cold and well-rinsed to remove excess starch. For extra moisture, fold in 1 tbsp melted coconut oil with the chocolate chips. The olive oil in the batter already provides richness, but this extra fat ensures that signature dense texture.
Can I use white beans instead of black beans?
While black beans work best for their neutral flavor and smooth texture, you can try cannellini or great northern beans in a pinch. Just be sure to rinse them thoroughly and blend until completely smooth. White beans may add a slightly different mouthfeel, but they’ll still work for moisture. For best results, stick with black beans—they’re the most reliable for this recipe.
How should I store and reheat leftovers?
Store brownies in an airtight container at room temperature for up to 5 days, or freeze sliced portions for 3 months. To reheat, place slices on a baking sheet and warm in the oven at 300°F for 5 minutes to restore crispiness. Avoid microwaving—they’ll lose their texture. For extra freshness, keep them in the fridge for up to 7 days.